Dice Desserts

Our MOPS group has several fundraising events throughout the year. This year's first event was a "Funco Night" an fun-filled evening of Bunco playing! Because of a family commitment (Saturday before the 3rd Sunday of the month) I was unable to attend and support our group. However the lady in charge of donations posted on our FaceBook page about the need for dessert donations (they ask local area businesses to donate all the food and prizes.) I thought, this is a way I can help! So I contacted her and let her know I was interested in donating (what I hoped would be) a cute selection of cakes! She enthusiastically accepted!

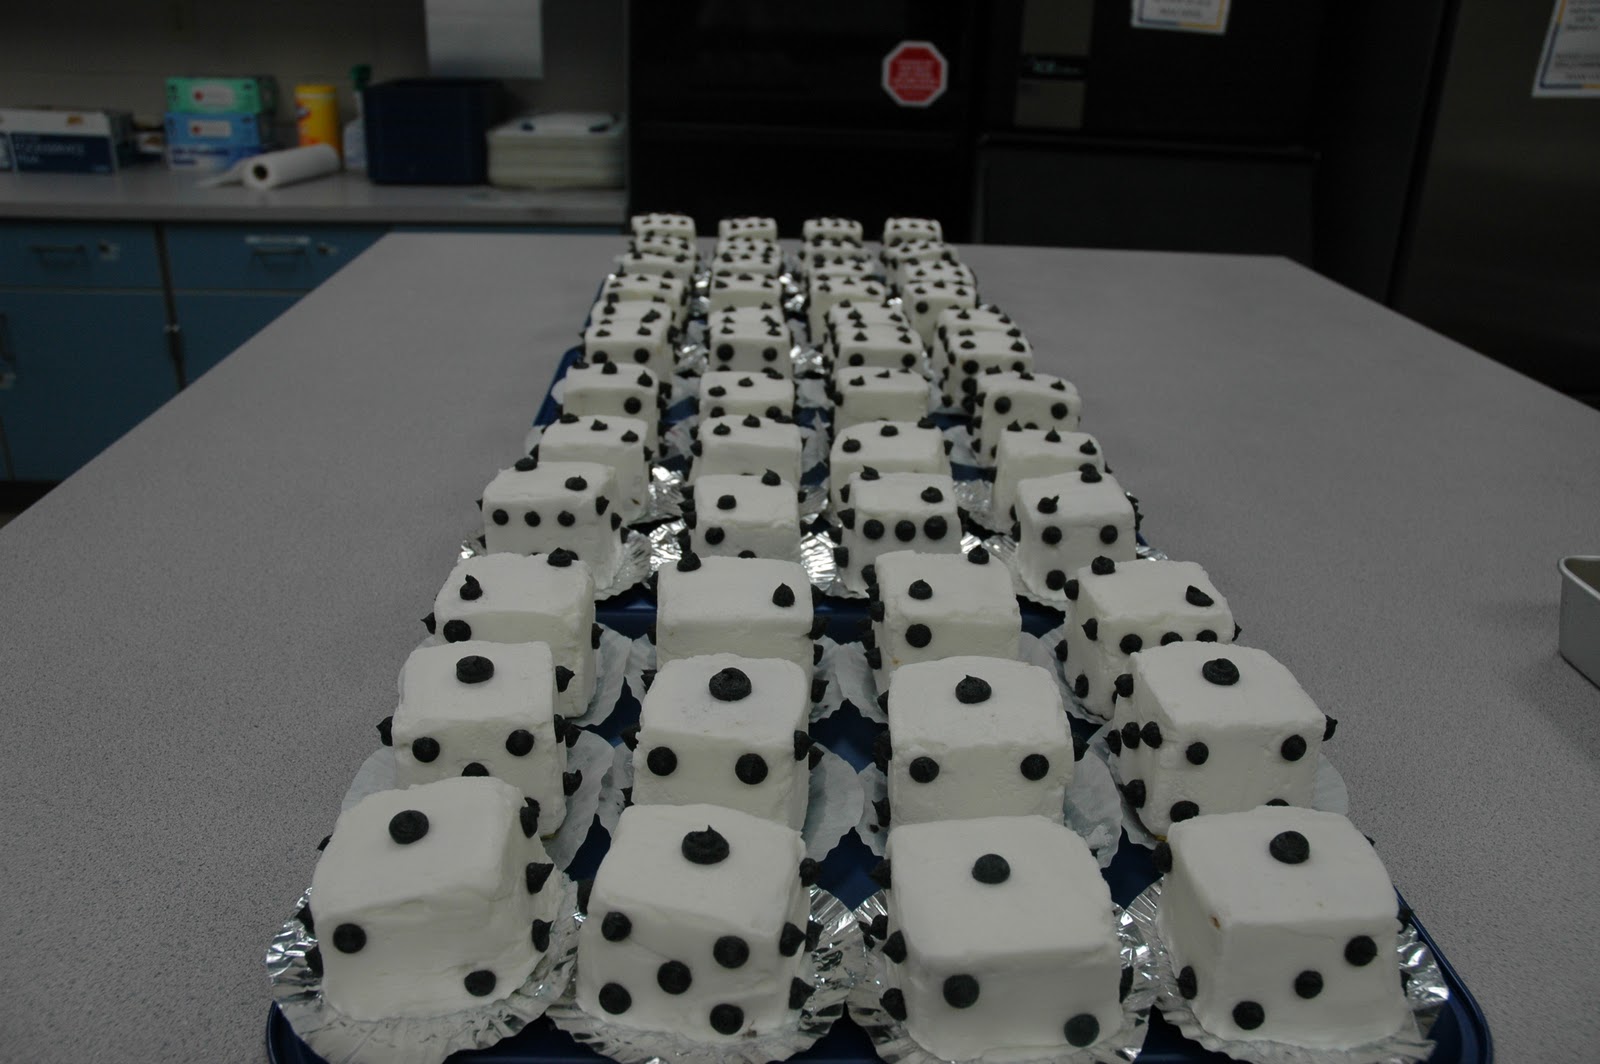
I thought individual cakes would make it easy for them because they wouldn't have to worry about cutting the cake and I could make them in cute dice shapes!

Friday morning I started! I baked 1 (yellow) cake in the morning and then realized that I didn't have enough eggs for my second cake! So off to the store I went! By early afternoon my second cake (confetti) was in the oven and my first cake had been sliced and placed in the freezer for an hour to freeze the crumbs to the cake.

Then the REAL work started! I have iced "sculpted" cakes before and didn't really think this would be all that different. WRONG-OH! In order for the icing to actually stick to the cake it had to be the PERFECT consistency (I found this out by batch 2.) 
After removing the cakes from the freezer I had to keep them in the refrigerator until I was ready for them. 

I would take 1 "block" out place it on an inverted cupcake wrapper and ice all 5 sides (as smoothly as possible) and then replace it to the "fridge" for it to "crust".
This was a tedious process...
I had 5 done before I had to leave for a previous engagement Friday evening. (The Reds game which was a lot of fun but FREEZING cold!)

I was up bright and early the next morning and back at it! Brake for breakfast (and to buy more powdered sugar) and then I worked for hours!  Here was my process:
Ice, 
chill (filling every available space in fridge, allowing 10 chilling cakes at a time),
Remove from fridge and smooth
Set to the side

My goal was to be completely done at 2. 
I finished this process at 2! :)

Next it was time to start the dots!
I pulled our my inspiration from our Yahtzee! game and started in!

I made 4 cakes of each type (yellow and confetti) with the same dot sequence (1 on top, 2,3,5, and 4 on the sides). This process was quick and painless and I was done in 1/2 hour! 
Then I took them all to church! Transportation is always the most nerve-racking part of the entire thing!

But they made it and were a HUGE hit!
However I think I won't offer individual cakes ever again unless they are cupcakes. 
(Cupcakes with Fondant dice would have been cute too! and EASIER! haha! Live and Learn!)


Comments

the third said…
Well done! Those are quite fun!
Unknown said…
Love this idea! Can't wait to try it for bunco night =)

Popular posts from this blog

Labor of Love (Part 1 of 3)

I love lace. I love the delicacy with which it presents itself to the world. That being said, I dont really use it very much. I do have some family doilies, and my wedding dress has some lace, but I dont go too crazy. I like to be able to clean things, and not have dust mites clinging to every available piece of cloth (they cling to everything else anyway.) So, I decided to try a painting technique. Why not paint the lace on the object? Easy to clean, lovely design, what could be better? We got this child's vanity in an old attic pick. Yes, we went into someone's hot and muggy attic for several hours. Yes, they let us jsut dig through things (can you believe it?!?!) unsupervised. Yes, we had to take our own flashlights. And yes, there was mouse droppings and dead birds up there. It was gross, but worth it. My boy LOVED it! American Pickers is his favorite tv show. So this school bus yellow vanity sat there looking at us. Begging for new life! I knew if we left ...

What's Cookin Wednesday - Sweet Potato & pinto bean tacos

SWEET POTATO AND PINTO BEAN TACOS adapted from thugkitchen.com ....but there is offensive language on the site (and in the recipes) - so you've been warned! 3 cups of cooked pinto beans (about 2-15 ounce cans) 1 teaspoons of coconut or olive oil (Olive oil is what I had) ½ cup veggie broth or water (water....) 2 teaspoons smoked paprika or chili powder (I went chili powder) 2 teaspoons blackstrap molasses (I used what I had in the cabinet) 2 teaspoons apple cider vinegar or lemon juice (I have both of these at home usually, went with lemon juice this time around) 2-3 garlic cloves 1 pound of sweet potatoes (this should be about 2 cups when you chop it all up) ½ of a yellow onion 1 teaspoon coconut or olive oil salt to taste soft corn tortillas standard taco toppings that you like to add. Warm the first teaspoon of oil in a medium pot. Add the beans, water, chili powder, molasses, vinegar, and garlic. Get it to start bubbling slowly for about 5 m...

Caning with Grandpa!

Here is what we were working toward! (Aka: the finished product!) I got this chair either out of the trash or very cheap. I cannot actually remember, as we have a host of chairs without seats in them waiting for a new lease on life. I have been wanting to work on a chair like this for some time. I had a dream a few years back of me sitting and caning a chair with my grandfather. Ever since that dream, I have wanted to see it happen. So this last weekend, I made the trek up to Indiana to spend a few wonderful days with my grandparents. The days spent with them are like living in another world. They have no TV, so we spend lots of time talking, reading and playing games. They live out in the country, and you can see the stars up close. It gets darker, since there are no city light or lights from other homes...which means they want to go to bed at 7pm. :-)... AND wake up at 4am. We got started caning the chair in the cold basement. All of Grandpa's tools were down there, so we coul...